Showing posts with label regimen. Show all posts

Thursday, November 20, 2014

how to start a healthy hair care journey

Posted by Yahya at 6:04 PM 3 comments
I've been working on this post little by little for months, I'm so glad to finally be able to put it up! The point of me creating this blog was my desire to help girls with my hair conditions take better care of their hair. But I realized most of the stuff I talk about is more for those that already have an idea of what they're doing. Every now and then I'd get messages from girls that wanted to start a hair care journey but had no idea where to start. Instead of rewriting the basics to them again and again, I decided to just publicly write it all here. I probably should have done this a long time ago. 


The basic components of a hair care regimen.

BASIC PRODUCTS
gentle shampoo or cleanser 
oil
moisture conditioner
protein conditioner
leave-in
wide tooth comb


BASIC REGIMEN

prepoo (optional, but highly recommended)
Short for pre-shampoo. This is where you coat your hair in heated oil, like a hot oil treatment, for at least a half hour before washing. Sometimes people use conditioner or an oil-conditioner mix instead. This protects your hair from sulfates and the harsh effects of shampooing. It also helps hinder the tangling that occurs during washing and gives the hair more shine after the wash. 


wash 
Shampoo should be done no more than once a week for us afro textured and relaxed girls, because using shampoo or any other cleansing product more than that could dry out our hair. A proper wash should start with thoroughly rinsing your hair and scalp. Then when shampooing, it's important to focus on the scalp and only let the suds rinse throughout the length of the hair, not applying the shampoo directly on the ends of the hair. Again, that would cause unnecessary dryness. The key to healthy hair is a clean scalp and a moisturized mane, not the other way around. For this reason, I would also recommend going no longer than two weeks between washes, because you don't want build up on your scalp either. The only time shampoo should be applied on the entire hair is when clarifying (deep cleansing) or when washing something (like chlorine) out.

Many healthy hair journey girls try to find shampoo without sulfates, sometimes completely discontinuing the use of shampoo for healthier alternatives. This is because shampoo often contains sulfates, a synthetic cleaning ingredient that is too harsh on the hair. It washes out not only dirt and excess oil, but also strips away our natural oils and moisture. Prepooing can combat this to a degree, but it's better to try to avoid sulfates or use them to a minimal degree. Also, when using other types of hair cleansing alternatives, the proper 'shampooing' techniques explained before should still be kept in mind.

cowash (optional between washes)
Between normal washes, you can try cowashing. Cowashing is short for conditioner washing, and like the name says, it’s where you use conditioner to clean your hair instead of shampoo. Rinsing your hair with water alone cleans it to a degree, and on top of that, conditioner has a gentle cleansing effect. Don't believe me? A while back JC from The Natural Haven conducted a little experiment to see how well cowashing really cleansed hair. Her findings showed that about 90 percent of excess oil is removed.

Cowashing, however, should not be used as a total substitute for shampoo or alternative hair cleansing products. Though it gently cleans the hair, whether it cleans the scalp is questionable. When cowashing, some girls will massage the conditioner into their scalp like shampoo. I would think that would not work on the scalp as it does the hair and would instead create buildup. Even Gina Rivera from Hairs Talent had cautioned me when I first told her I cowashed. She told me she had to do scalp only cleansing treatments to many of her natural clients, because many of them cowashed, going a month between normal washing. Though their hair was fine, these clients had scalp buildup. Click here to view a video where she talks a little on this subject. In conclusion, cowashing gently cleanses your hair, moisturizes it, and makes wash days easier, but it should not be overused.


protein conditioner 
Protein treatments strengthen and bring structure back into the hair strand. They are more optional for natural girls, but are important for relaxed girls, or girls who do any kind of chemical treatment or heat styling. Hair is made up of about 90 percent protein. Doing a protein treatment ‘patches up’ the damage from chemical processes to daily wear and tear. One should be cautious, however, with the amount of protein they use in their regimen. Protein has gotten a bad rep because girls sometimes use too much and end up getting protein overload. I was one of them. One of the most important keys to healthy hair, if not the most important, is the hair’s moisture and protein balance. A MizzSlick from BHM shared an extensive explanation on this balance and other essential information on the forum. (I think she mistakenly said "Hair is about 70% keratin protein by nature" when she meant 90 percent. And rather then wet assessment, I recommend an elasticity test for more accuracy.)  How often you should do protein treatments and the strength of it depend on this balance. Lastly, when doing protein treatments, it’s also important to know that you have to follow up with a moisturizing conditioner that matches its strength. If it’s a heavy protein deep conditioner you have to follow with a heavy moisture deep conditioner, or your hair can become hard.

moisture deep conditioner 
For us girls with hair on the dry side, moisture conditioning is your best friend. Unless you’re cowashing, moisture deep conditioning should be done every time you wash. Something to watch out for, moisture conditioners will often contain a little protein ingredient or two in them. It’s kind of hard to find a conditioner that is completely protein free. This is fine, but it is something you shouldn't forget to calculate in when considering the amount of protein in your regimen and keeping your hair’s moisture-protein balance stable.


moisturize & seal
A good leave-in is one that moisturizes your hair without making it greasy or too weighed down. After washing, rinsing out your deep conditioner, and drying your hair a little, a leave-in is best applied while your hair is still on the damp side. This is the best time because the still damp strands creates a more even application. At the same time, the strands are not still too wet for the leave-in to penetrate. Moisturizing should light-handedly be followed by an oil to ‘seal’ in the moisture. Oils do not moisturize, they seal the moisture already in the hair. I like to think of it like a cup with water and oil on top. Sealing makes it harder for moisture to leave the hair. One should re-moisturize & seal throughout the week, whenever your hair starts feeling dry again.


drying 
The best way to dry your hair after washing is to first, dry it with a giant t-shirt instead of a towel. A towel if rigid and rough and was really made for our body, not our hair. When towel-shirt drying you also shouldn’t ruffle up your hair in the towel, simply squeeze and pat. Second, when drying it is healthiest to air dry your hair with oil, or to blow dry it with cool air. Air drying is the option most healthy hair journey girls go for, it creates little to no damage and the hair strands do not lose as much water. Plus it’s the lazier option. If your hair is wet for too long, however, it can cause your hair strands to swell, disturbing its structure. So if you know your hair takes a long time to dry, you should either use oil on wash day or blow dry on cool when your hair is about 70 percent dry. Using oil is something you should already be doing on wash day, when you prepoo and seal. Coconut oil in specific is known to be good at preventing hygral fatigue (swelling and contracting of the hair strand).

Direct heat like normal blow-drying and flat ironing isn’t something you want to keep in your routine when you start a healthy hair journey. Direct heat usage should be a maximum of at least two weeks apart, and a minimum of never. Too much blow drying on a hot setting can cause the water in wet hair strands to boil, which is worse for your strands’ structure than swelling. Flat-ironing can burn your hair, and takes away moisture and protein. If you can’t see yourself living without heat, opt for healthier options like roller setting and going under a hooded dryer.

combing
Combing should start from the ends on your hair to the root. Starting from the roots you're trying to pull through tangles which causes breakage. Hair is its easiest to comb in the shower, but at the time hair is weakest when wet. So if you're relaxed, combing in the shower is something you might want to avoid. If you're natural, combing in the shower is something you should probably practice. Opt for a seamless wide tooth comb, as both technique and the tools involved are important. 

Another thing that it good to practice is finger detangling instead of taking out the comb every time. And that goes with more emphasis to girls stretching their touch-ups and have blooming new growth. Your line of demarcation will thank you.  

Thursday, January 16, 2014

thickening, yet thinning? (officially a setback)

Posted by Yahya at 10:45 PM 2 comments
LENGTH CHECK
I noticed my hair ends were starting to look straggly during my recent stretch, but I wasn't sure because I wasn't wearing my hair straightened. Sometimes your ends can just look thinner when you have a lot of new growth. I aligned a picture I just took with one from half a year ago and one from right after my first jhs at Hair's Talent, and I noticed my ends have been gradually thinning. My hair seems to be thickening from the top, but thinning from the ends. It went from blunt to a u/v-shape. In the picture below from after my Hair IB touch-up (I always wear a robe at home...), my hair is measuring 27 inches. But when I trimmed off the straggly ends it was reaching 24 inches. Huh? When I trimmed off thin ends, it had always been to 25-26 inches. How'd I lose an inch of thickness? I thought about all the possible culprits. 

(I really, really, don't like stringy ends. 
Though I trimmed right after, it's embarrassing.)

THE BLAME GAME
  • I had overcame a pretty bad protein overload a while back from using henna and Aphogee 2 Step for the first time, in the same month. Dumb move. Though I did not lose length, even gained length, my ends were noticeably thinner compared to the rest of my hair. It was a presentable kind of thin though, trimmed to a blunt cut. You guys have seen the after Hair's Talent pictures. When I noticed my ends were straggly as my hair was growing out, I thought the reason had been that my ends were thin about 6 inches up from the overload. I was going to have to thicken my ends back up before I could have my normal even growth retention back. But that protein overload was a year ago now, my ends should have thickened up by now, not gotten thinner. Plus it wouldn't cause me to lose an inch.
  • I was now stretching for long periods of time and on top of that increasing my growth rate, so I was dealing with a lot of new growth. But I was handling it well and wasn't seeing enough breakage to have lost an inch. I had gotten massive breakage from my protein overload and had not lost an inch. Then I considered it was the line of demarcation breakage in combination with my thinner than normal ends. It's more likely, but I still doubt it. If this is at fault, it was an accomplice and not the main culprit. 
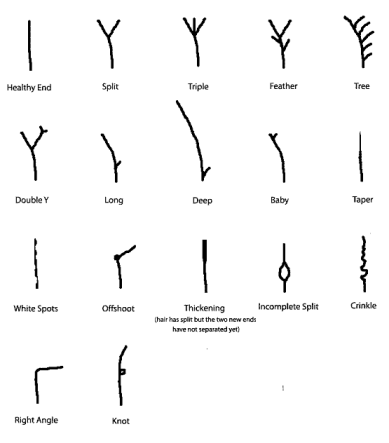
  • After thinking it out, I'm now sure the main problem is that my relaxed ends are wearing due to getting over processed with Japanese Straightening. This was like a revelation, because the thinning was so slow and my ends were acting normal. They were drier compared to the rest of my hair, but not alarmingly dry or breaking. The only clue I had, but ignored, was that the cuticle size of my ends looked thinner. A sign of wearing. I was also getting types of split-ends I never had before, and though there weren't throughout my ends I did find myself dusting more often. Looking at the diagram below, before I had only known split, baby, and sometimes triple ends. Now, though they aren't abundant because of my frequent dusting, I've seen half of these, mostly long tapers.   


SETBACK
I'm officially treating this as my second setback. So for those of you relaxed heads out there, be careful if you're planning on transitioning. I've seen other girls transition more gracefully, but now that I think about it they had shorter hair. The ends of their hair not being as old as mine may have something to do with it. When I think how Hair IB just rinsed the jhs solution with no protection... oh, boy. But now that I know what's going on I'm going to do all I can to stop this. It seems like with all slow transitions, to natural, texlaxing, even Japanese straightening, your relaxed hair always have the chance of suffering.

This has been my first time having a problem retaining length, I've been in the same area for a year now. Plus I've lost an inch and my ends are noticeably thinner. Is this why my growing ends have been so stringy? I thought one of the reasons was because the growth methods I was doing were only having affect on certain parts of my head, but now I'm not so sure. Though I can't see the hard work I did testing growth methods on my ends, I can see it around my head. Currently the majority of my Japanese straightened hair ends on my shoulders. Around 10 inches. And if I had not been increasing my growth rate, I would have lost more length.


STRONGER ENDS REGIMEN

I thought about trimming my thin ends and starting over, from about 20 inches. But I'm also afraid that will make it worse as the type of damage I'm dealing with is unfamiliar and doesn't seem to be a common thing. I spent a week trying to find scenarios like mine, but found none, probably because not too many transition from relaxed to jhs. I'm like the first genie pig documenting my transition. Many of us were taught to trim off damaged ends. The reason I'm scared to trim is because if you don't trim above the damage, the damage will just continue to travel up the hair shaft. And faster, because you just gave them a lift up the strand. This whole time my ends acted relatively healthy, so I'm not confident where the damage actually starts. So I've decided to keep these ends for half a year, until after my 6 inches in 6 months challenge and growth aid exams. After that, if I don't see improvement or the situation has gotten even worse, then I'll trim.

I'm determined to overcome this! I find the worse the hair problem, the more effort and motivation I feel to correct it. Above, I have a diagram showing how I'll be changing the protein usage in my regimen. Ever since my protein overload I had become more weary of protein, keeping my hair more on the moisture side, but this probably wasn't helping my situation. Now I plan to increase it's usage to strengthen my ends. In the diagram, the parts of the hair that's colored in represents the part that protein treatments will be applied. I've explained this strategy in interviews, but I don't think I ever got to talking about it on my own blog. the logic behind this:

"I treat my hair like a hierarchy. My new growth is the protein rich, under that is middle class, then lower class, and my ends are in poverty. To turn this natural hierarchy into an equality, I have to give more proteins to the ends and less to my new growth. I believe this also helps my line of demarcation. One can do this layering in many different ways but I do it simply by doing protein cowashes. Between real washes I might cowash the bottom half of my hair, rinse that out, and do another cowash on my ends. Sometimes I do this layering by applying protein leave-ins more on my ends and less as I go up." 

Now that I've decided to stop being afraid of protein, I'll be practicing this protein layering more. And not by cowashing, but with protein deep conditioning. In the diagram where I put split end mender, I'm referring to Nexxus Promend, a product line that doesn't actually mend split-ends, but temporarily glues them. This line has gotten many good reviews, and though it can't actually repair it supposedly stops splits from traveling up the strand until you're ready to trim. I plan to use the overnight treatment and conditioner for that wash day. I've already got some experience with the overnight treatment.

Other things I plan to change & incorporate into my regimen:
  • Strengthen hair by doing protein treatments every other wash. Aphogee for over processed hair, henna for coating and thickening, Nexxus Promend for gluing split-ends. 
  • Use my awesome new Secura steamer for better deep conditioning on wash days. I recently got it for the holidays and my birthday.
  • Prepoo at least an hour with coconut oil and add to deep conditioners to prevent hygral fatigue and retain protein. 
  • Use Nexxus Promend Target leave-in after every thorough shampoo (which is every 2-3 weeks). According to reviews the Promend Target leave-in is the top product of the brand, but its affects washes out with shampoo.
  • Seal hair with coconut and grape seed oil mix, and ends with jbco. Both coconut and grape seed oil prevent cuticle wearing in different ways. Castor oil is heavy and is known for being a great sealant to the ends.
  • Keep hair in protective styles. Keep shorter ends in skinny braids and only take them out on wash days. I've always been a low manipulation style girl rather than a protective style one, but that was because I never had problems retaining length and low manipulation styles helped to prevent breakage better for me. But changing hair needs means changing practices.
  • Only comb hair once on wash day. When my new growth started blooming, I use to detangle twice on wash days, once after prepooing and once after washing. This round I plan to keep combing to a minimum early, and I plan to try only combing after washing.
  • Balance increased protein usage with ghe method and leave-in steaming when needed. Leave-in steaming is only something I've heard of after I got my steamer. It's kinda how your hair gets moisturized from the steam of the ghe method, but instead you just go under the steamer for 5-10 minutes. You don't even have to moisturize your hair before hand or undo your hair if it's styled.
  • Continue testing growth aids and increasing growth rate, aiming for 1-2 inches a month.
  • Do the search & destroy method. No trimming, no dusting. Because I'm not sure if cutting my hair is actually making it worse, I plan to only do search & destroying.
(Wish me luck! ;_;)


Sunday, November 24, 2013

new growth TLC (stretching touch ups)

Posted by Yahya at 5:55 PM 0 comments
It's been about 25 weeks since my last touch up and I'll be visiting a hair salon very soon. Today I'll be talking about how I stretch my touch ups and care for my new growth when it really starts blooming.

Keep hair in low manipulation style 23/7 or solely flat iron new growth. Doing this minimizes the breakage from the line of demarcation. For this particular stretch I kept my hair in a low braid for the majority of the time, I find that low styles are less manipulating than high ones. Keeping my hair tied up really lessens tangles so I can breeze by the week with just finger detangling. Sometimes I'll use a comb, but only on my relaxed length. Usually during a stretch, however, I interchange with flat ironing. I leave at least a 2 week gap between flat ironing sessions. This allows me to have my hair out and be less cautious about combing.


Hold hair while shampooing to prevent tangles. This is the most recent technique I've been doing, and it really helps. Pulling and holding a section of your hair with one hand while the other hand massages the shampoo into your scalp helps keep your hair strands from going this way and that way, cutting the amount of tangling that usually comes with shampooing.

Only thoroughly detangle new growth on wash day ( especially when it isn't flat ironed ). I usually detangle twice on wash days: before washing and thoroughly after washing when it's almost dry. Yes, when it's almost dry. Combing natural kinky hair is usually easiest in the shower, but that does not mix well with relaxed hair. At least not with my hair. The line of demarcation is already weak, and then hair is weakest when it's wet. The farthest I may go is finger detangle under the shower. Combing when my new growth is almost dry works better for me because I stretch the curl and detangle my relaxed hair first.

Coco caramel treatments. This is just my combination of the coconut cream and caramel treatments, aka natural relaxers. Calling them relaxers is an exaggeration, but they do help many girls loosen and really condition their natural hair. They are also often used for better flat ironing. When I start getting deep in my stretch I use them as my deep conditioners, some wash days I only use them on my new growth.

MY RECIPE:
1/2 CUP coconut milk
1 JAR banana food
1 TBSP molasses
3 TBSP honey
2 TBSP coconut oil and grape seed oil
1 TBSP apple cider vinegar
1 TBSP rose petal powder


Don't let new growth curl up when drying, band new growth right after towel drying. When my new growth really starts accumulating I stretch my curl by doing the band method solely on my new growth. I do this with small hair ties and wrap lotion, just because it was something I had on hand and it's easy to distribute. It's important to start on wet hair or it won't take at well. Doing this also aids detangling. I comb out my relaxed length while the bands are still in, resulting in no breakage. Then I take out the hair bands and comb out my stretched out new growth, which is easier because there's less curl and the bottom portion of my hair is tangle free.

Saturday, October 5, 2013

my hair regimen (flow chart version)

Posted by Yahya at 11:58 AM 0 comments
On wash days I really do my hair by feel rather than a schedule. I feel that schedules are good when your hair is malnourished and your just starting on your hair journey, but then when your hair regains health you have to be specific about your hair's needs. It's like feeding a malnourished child. First, your focus is to get food into him until he is meatier and relatively healthy. Then you want to make sure he has a balanced diet so he can become a vision of health. Hair works similarly, where a perfectly balanced diet is balancing your moisture and protein, also your porosity and elasticity. With relaxed hair, this is especially true as your hair has to be in a more perfect balance to be healthy and stable. It's easier to tilt and get breakage.

So since I do everything from feel, writing about my regimen has always been a bit of a challenge since what I do varies a lot. I feel it never comes out clear, but complicated. Well, because it is complicated. My hair regimen doesn't even resemble a schedule. To try to make my hair regimen clearer I decided to make it into a flow chart. Not sure if it worked... so I might write it out another time. You can also find the written version of my regimen on Relaxed Hair Health and Hairlista.

note : Colored arrows mean that that path is fairly specific or only specific to that path's start. For ex: only when I use a moisture deep conditioner before washing might I use the roux ph corrector to leave-in path.


Tuesday, June 11, 2013

japanese straightening (real alternative to relaxers)

Posted by Yahya at 10:11 PM 15 comments
DIFFERENCE BETWEEN RELAXING & JAPANESE STRAIGHTENING
so about half a year ago, November-December, I Japanese straightened for the first time at a salon called Hairs Talent in Connecticut. I choose to Japanese straighten because...

1.  it's a much less harmful chemical than relaxing. while relaxers uses sodium hydroxide (ph of 14) or calcium hydroxide or guanidine hydroxide (ph of 9-11). Japanese straightening, on the other hand, uses ammonium thioglycolate, the same chemical used in curly perms. and has a ph of 8-9.

2. the disulfide bonds in the hair are replaced rather than permanently broken. as stated before in hair patterns, "disulfide bonds are two sulfur atoms that are connected to each other. straight hair, which has a rounded cuticle, has disulfide bonds that are aligned and scarce throughout the cuticle. curlier hair has more oval, half moon shaped cuticles and more disulfide bonds that are arranged in a more slanting pattern... sodium hydroxide relaxers work by replacing the original disulfide bonds with a bond called a lanthionine bond, which only has one sulfur bond (this decrease in sulfur bonds gives it a structure more similar to straight hair). curly perms, on the other hand, work on the hair by forming new disulfide bonds with two sulfur atoms".

when using ammonium thioglycolate, whether in a curly perm or Japanese straightening, the sulfur bonds are temporarily broken and than reattached back, while in a sodium hydroxide relaxer the sulfur bonds are permanently broken because they're turned into lanthionine bonds where there is no longer two sulfur atoms, but one.

3. less product usage. because there isn't as much protein and moisture lost, and the hair porosity isn't raised as much, less deep conditioning, leave-in, and "fixing" is needed. the health of the hair is more stable compared to relaxed hair. think of the extent of damage like dyed naturally straight hair, this is the amount of care it'll need.


4. straighten curl rather than relaxed curl. rather than a relaxed curl, Japanese straightening literally straightens your hair. your hair does not have the personality of curly hair, no frizz. you can air dry your hair and no frizz. as my hair has been getting longer I wanted a little less volume and less detangling.
after blow drying at Hair Talents
Japanese straightened roots--Relaxed length        


 5. stronger line of demarcation. even though the texture difference is increased there is less breakage when stretching compared to relaxers, making transitioning easier. also, you can put a curly perm over your straightened hair is you ever want to go curly, because the two processes use the same chemical.

NOW THE BAD
you are suppose to have at least 3 inches of growth to do it, if your Japanese straightening your whole head and have split ends it can make your ends look fried (usually people cut an inch off after the process, but this doesn't happen with touch ups); the process is lengthy and can take from 3-6 hours depending of your hair; it's hard to do it yourself, especially if you're not use to applying stuff on yourself, it's better to have 4 hands when applying this; it's a new thing so there isn't that much information about it in the hare care journey community, especially because of the myth that it can't be done on afro hair; and at salons it's expensive. veeeery expensive.

WHY JAPANESE STRAIGHTENING ISN'T "SUITABLE" FOR AFRO HAIR
the reason it's said that it's not suitable for afro hair is because you most likely, especially is your doing it yourself and isn't being done by a hair style expert, won't get the dead straight results Japanese straightening promises. it's suppose to give you shiny straight hair like the typical Asian hair. kinky hair will have a more subtle shine and not be poker straight and the kinkier your hair, the more likely you'll get a little wave. but to me, that's ridiculous! the results are still better than relaxed hair, and you can always lightly flat-iron if you want that pin straight look! and I'm sure most girls here don't even want that pin straight look! if you Japanese straighten to get pin straight hair, know that it will be harder to hold a curl. to get the texture you want, you can judge your curl type and get a resistant, normal, or mild formula.

WANT INFORMATION FROM AN EXPERT?
Japanese straightening goes by many other names: thio relaxer, thermal reconditioning, thermal relaxer, etc. as stated before, there is not much information about Japanese straightening in our community. I myself have now only straightened my hair using this solution twice. once at the salon and once at home. I know a lot on the subject, but I am not an expert. still learning. so I might not now all answers if asked for advise. (sorry!) here is a site I found of a stylist who is very educated on the subject and has a forum where he gives very educated answers to thio relaxed heads. the website is called Verticals in Hair. he really gets deep into the science behind straightening. Hairs Talent, which is on youtube, is also a good place to get more information about Japanese straightening as the main stylist is also an expert. there are many videos showing that Japanese straightening can be done on afro textured hair. and here is an example:

notes: one, she's not applying the solution throughout the hair, she's applying a protection cream on the preciously treated hair. two, they are not using gloves because the solution is so mild. three,  in the video she doesn't say it, but the little girl's mother didn't have the same hair type and didn't know how to take care of it, but didn't want to relax it. personally, I still think you should wait until age 13 and until your child is mature enough before permanently straightening their hair, because even though hair health isn't an issue as with sodium hydroxide relaxers, the child might grow up with identity issues. but I also understand their situation. and lastly, in the video she's saying bad hair isn't a hair texture, everyone has bad hair, but when you learn how or know how to take care of your hair is when your hair is good hair. good hair is healthy hair that looks good on you. the video didn't get the ratings it deserved due to people misunderstanding what she was saying.

~~~~~~~~
HOME JAPANESE STRAIGHTENING
although I loved the results I got from Hairs Talent, it was just too expensive and far away. but I met someone who also Japanese straightens, LadyAradia from hairlista.com, but does it at home. I had no idea they sold Japanese straightening kits! the two I'm more familiar with is One n Only thermal ionic straightening and Quantum thermal straightener.
I Japanese straightened my roots about a week ago using One n Only thermal ionic resistant formula.  at sally's I noticed the thermal kit had an added label that says "keratin" on the box, and I have no idea why. people might confuse it for a Brazilian keratin treatment. it might be because the straightening lotion has four different proteins.

the ingredients for the straightening lotion:
water, ammonium thioglycolate, cetearyl alcohol, diammonium dithiodiglycolate, laureth-23, mineral oil, pentasodium penetrate, ammonium hydroxide, sodium lauryl sulfate, hydrolyzed keratin, hydrolyzed corn protein, hydrolyzed wheat protein, hydrolyzed soy protein, fragrance, benzyl salicylate, hexyl cinnamal, linalool.

what the kit comes with:
a clarifyig shampoo
porosity leave-in
straightening lotion
neutralizer

and here is the looong procedure that happened:
20 minutes )  applied roux ph porosity on newgrowth. I had absolutely no breakage doing this thanks to the henna gloss I did last week.
5 minutes ) went under dryer
10 minutes ) used clarifier & plan apple cider vinegar rinse
about 30 min ) airdried instead of blowdrying, applied porosity leave-in on semi damp hair
about 30 min ) detangled hair to the point where a fine tooth comb could pass and divided hair in 8-9 sections. I had been experiencing little breakage when combing during my stretch, especially since using henna the previous week. but since my hair was dry without any real conditioning (the leave-in is very light and liquidy) I did get some breakage at this point.
about 30 min ) applied protection cream on previously treated hair. the protection cream made my feel a little stiff so I was afraid I was getting protein overload since I just hennaed it last week and had no idea what the cream was made of, there was no ingredients on the jar. since it was a chemical protection it could have been filled with heavy proteins.
20 minutes ) starting from back to front, applied straightening lotion on newgrowth
10 minutes ) continued to smooth the newgrowth and apply more lotion to areas that looked like it needed more
20 minutes )  had plastic cap on. processing time always scared me! I was worried because the back of my head had the lotion on for 50 minutes, but my front 30, but than again the back of my head is curlier than the front. though the directions say up to 30 minutes, I read reviews with people going longer like 45 minutes. I also realized I wasn't sure how it should look when processed. when I saw the curl was loosened and wavy-ish was when I thought it was processed, but my mother thought it was suppose to be straight.


13 minutes ) I rinsed my head for 7 minutes, lifting my hair so it wouldn't rinse into my relaxed length. then I let my hair down and continued rinsing. I was relieved at this point because my relaxed length felt moisturized rinsing out the protection cream, and from this point forward I've experienced no breakage. at this point my hair still had some texture to it.


about 1 hr 30 min ) I applied the porosity leave-in and aphogee again, then blow dried the roots of my hair, which was very easy, to 80% dry. my roots were flat ironed in skinny pieces and a 90 degree angle using a corioliss ceramic flat iron (I used a ceramic instead of a tourmaline ceramic because ceramics flat iron straighter ). and THEN I lightly flat ironed the rest of my hair using my fhi go styler tourmaline ceramic iron (I'm still not perfectly sure why the whole head has to ironed, but better safe than sorry). my hair, especially my roots, looked pin straight at this point.
20 minutes ) I saturated my hair with the neutralizer, especially the roots (the whole head is suppose to be neutralized even with a touch up). at this point my hair didn't revert back to how it looked when I first rinsed out the straightening lotion, but it didn't stay pin straight either. it looked like it has it had a flattened wave, if that makes sense.
about 30 minutes ) I let the neutralizer sit for about 10-20 minutes and rinsed out my hair for 7 minutes. I than used the rest of my apple cider vinegar rinse since I had left over and didn't want to use a conditioner. using a conditioner is optional but using one can hinder the final results of your hair if your trying to go for a more straight look. but I felt the acv make a big difference in the smoothness of my hair. I only rinsed out half of it and left in as a leave-in.


45 minutes ) I applied the leave-in and aphogee once more, blow dried my roots with my fingers, and lightly flat-ironed them with my fhi go styler (on about 200 degrees). finally done!


(( click here to see my update ))


Sunday, May 5, 2013

crazy growth overload!

Posted by Yahya at 3:44 PM 2 comments
this is a recording of my hair growth for the past several months. recently I was participating in a hair growth challenge, well actually, I started it rather then being just a participant! it started the first of january and ended the last day of march, lasting 3 months. it was called 'The Super Ultra Crazy Growth Overload Challenge,' awesome name right? each participant had to do a certain number of hair growth practices, as the goal was to reach 3 inches in 3 months. for those of you who don't know, the average growth rate is 1/2 an inch per month.

when I started my hair length was 25 inches, reaching waist length. and my usual growth rate is 1/2 an inch every 5 weeks. on february 10, however, I measured my hair and it had reached to 26 inches. in 5 weeks! and double my normal growth! my hair didn't grow evenly though, but it still looked acceptable.

usually my hair grows pretty evenly, but it's been handicapped due to the protein overload I went through about half a year ago. usually girls that go through this lose a lot of inches, I'm just grateful I only lost one inch of predicted growth.  I didn't lose any inches I already had, my hair still grew!

although my end were evened out after a little trim, the thickness in my ends were gone. you can see how my hair looked below...


and the regimen I followed that lead me to gaining an inch was...
  • use sulfur/jbco (jamacian black castor oil) mix twice a week
  • mini scalp massage after applying growth aids
  • use cayenne pepper oil 30 minutes before washing
  • wash/co-wash every once a week
  • bun whenever at home and baggy for at least an hour
  • ghe method (green house effect) two times overnight
  • dust hair once a month 
  • daily multivitamin, garlic, fish oil, and zinc supplements

as it became the middle of my semester, however, I started slacking on this schedule. the only things I continued doing was dusting, taking my supplements, bunning, and sometimes using cayenne pepper (I would forget x p). but somehow, when I measured my hair on the last week of the challenge, my longest hairs reached to 28 inches. that was a big surprise as I wasn't even following my regimen anymore. I had gained an inch and a half in 7 weeks! my hypothesis is that it was the zinc. looking it up, zinc is suppose to benefit hair growth, but I never see many health hair journey girls talk about it. I'll be testing this soon though, by using just zinc and seeing if I see a difference.

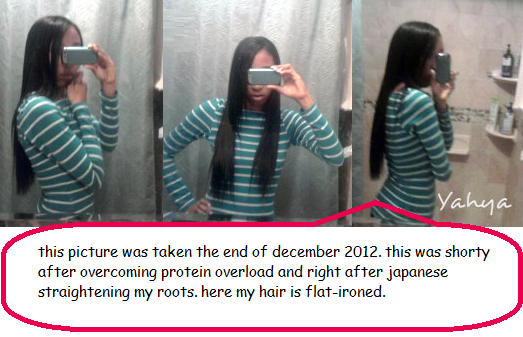
by the end of the challenge, my ends were so stringy I trimmed an inch, but accidently trimmed two off. oops, oh well. my hair needed it though. so currently I'm back to 26 inches, with 3 inches of new growth. the picture right above is the same as the one with the purple shirt below, but I stretch my hair out so you can see the length better as my hair wasn't perfectly straight. because my hair isn't flat ironed like in the first collage, you can notice my thin ends better.


Friday, March 29, 2013

conquering protein overload

Posted by Yahya at 10:59 AM 8 comments
when trying to conquer protein overload the best battle strategy is to only use moisturizing products with no trace of protein. It took me a while to realize many of my moisturizing products, and even shampoos, had traces of protein. I also didn't want to spend a lot of money, so I tried getting the most effective and cheapest products I could. below I've listed how I changed my regimen to combat protein overload, listed from the most helpful.


PRODUCTS
  • Hairveda Whipped Ends 
    • very good leave-in, a little expensive with shipping, especially if you're buying it alone. the shipping for american residents is about 7 dollars.
  • Hairveda Sitrinillah
    • also very good, but can be expensive with shipping like the whipped ends.
  • Aubrey Organics Honeysuckle Rose 
    • also kinda expensive, but it was the most effective in reversing my protein overload. I used it as a deep conditioner and diluted it to use as a leave-in to stretch the dollar. this is also easier to get, usually found at your local vitamin shoppe. 
  • Queen Helene Cholesterol 
    • has mineral oil, but was very helpful. breakage is associated with protein overload because the hair is stiff and has little elasticity, but cholesterol helps restore elasticity. one thing that people may not like though, is that it has a distinct smell. to me, it smelled like the ferret shampoo I use to bath my ferret with. so I actually liked it because it brought back memories! 
  • Honey & Molasses 
    • cheap ingredients to add to conditioners to give them a moisture boost.
  • Mane n Tail Detangler 
    • helped detangling, because protein overloaded hair tends to stick together, making it knot easily. I only used it a couple days before washing because it has cones, which will not mix good with protein overload if there is a build up. 
  • Suave Almond & Shea Butter 
    • simple cheapie conditioner with no protein
REGIMEN
  • deep condition or co-wash once a week with steam 
    • helps the conditioner to penetrate the barriers of protein. I used the steam from my college's steam room and sauna.
  • clarify (with castile soap and jojoba oil) every two weeks 
    • clarifying dries the hair, but it also gets rid of the traces of protein product coating your hair. product build up is also not a good combination with protein overload. the castile soap also opens your hair's cuticles to take in moisture better. just make sure to close them back afterwards. 
  • final apple cider vinegar rinse 
    • to keep the hair's ph balance stable since I could no longer us roux ph corrector, which has protein in it. this also helps to keep the scalp clean when co washing and seals in the moisture after deep conditioning and using castile soap.
  • baggying & wet bunning
    • baggying excessively is one of the top things that really helped me. if I didn't do excessive baggying and wet bunning I'd still have protein overload ( wet bunning is when you bun your hair after washing and conditioning it, so that the hair stays wet and moist longer ). what finally got rid of my last traces of protein overload was when I left a bag on for 3 days in a row! with a good leave-in 
  • protective styling 
    • I kept my hair in braids (at least 8 total), and later twists. I found the twists worked better from keeping my hair from tangling. I also kept them in the shower because that's when my hair would really tangle. the only times I took them out was to detangle and moisturize my hair. 
THINGS I LEARNED
  • not to pile your hair with moisturizer or conditioner, because that just creates build up. being light handed and not heavy handed is more effective. 
  • stay far away from all protein ingredients, even if it's a little bit. especially from any hydrolyzed protein, which means the protein is small and molecular so it can penetrate the hair better. 
  • stay away from coconut, avocado, and banana ingredients, especially as a leave-in. coconut helps keep the protein in you hair, and all of them have little traces of protein. 
  • don't use any ayurvedic powders like amla, shikakai, and henna, because they all have strengthening properties like protein. 
  • extra virgin olive oil and grapeseed oil are the best oils to seal with. especially with relaxed hair because they're light, but penetrating.


Related Posts Plugin for WordPress, Blogger...
 

pocahontas' hair secrets Copyright © 2010 Designed by Ipietoon Blogger Template Sponsored by Online Shop Vector by Artshare