Showing posts with label protectives. Show all posts

Sunday, August 16, 2015

how to make a braid that protects your ends

Posted by Yahya at 2:20 AM 10 comments

MY MOTIVATION
This is a style that I came up with about a year or two ago, and it has become one of my most frequent go to styles. I love low manipulation styles, like a easy single braid or two Pocahontas braids, because my hair stays tangled free for long periods of time. The down side, however, was that I didn't like to braid all the way down, I liked the look of my ends out--but at the same time, having my ends exposed would bother me (especially when my ends were thin). After seeing the East Indian inspired paranda braids some girls make from yarn, I was inspired to use scarves (which is better for your hair than yarn) for a time. After wearing scarf braids for a while a light bulb turned on and I had the idea to use synthetic hair.

I've never worn a wig, weave, or any kind of fake hair, so I guess I was hesitant at first. I'm so glad I did follow through on my idea now. What makes this style so great is that it's low manipulation and a protective because it keeps your hair from tangling and your ends are tucked in. Plus it gives you a slight length booth, and for those with thin ends, make yours ends look fuller.

LOW MANIPULATION 
& PROTECTIVE STYLE BRAID TUTORIAL
step one - Have your synthetic hair and a hair tie handy.

step two - Braid your hair until the point where you want to insert the synthetic hair, which should be where the ends of the synthetic hair ends a little further than your real ends when aligned.

step 3 -  Insert the synthetic hair by holding it at the middle and placing it against two of the three strands being braided (I usually pick the thinner or shorter looking two strands).

step 4 - Continue to braid the hair like normal until you near the end.

step 5 - For the one strand of hair that doesn't have synthetic hair blended into it, borrow synthetic hair from one of the other two.

step 6 - Finish braid until there is only synthetic hair left out and then secure with the hair tie.


And that's it! Writing it makes it sound more complicated then it actually is, hopefully the animated gif helps. I bought my synthetic hair at a local beauty supply for $2-3. The label says 'Glance: Yaky Pony Braids,' and the color is 1B--natural, brown undertone black. 


Sunday, November 24, 2013

new growth TLC (stretching touch ups)

Posted by Yahya at 5:55 PM 0 comments
It's been about 25 weeks since my last touch up and I'll be visiting a hair salon very soon. Today I'll be talking about how I stretch my touch ups and care for my new growth when it really starts blooming.

Keep hair in low manipulation style 23/7 or solely flat iron new growth. Doing this minimizes the breakage from the line of demarcation. For this particular stretch I kept my hair in a low braid for the majority of the time, I find that low styles are less manipulating than high ones. Keeping my hair tied up really lessens tangles so I can breeze by the week with just finger detangling. Sometimes I'll use a comb, but only on my relaxed length. Usually during a stretch, however, I interchange with flat ironing. I leave at least a 2 week gap between flat ironing sessions. This allows me to have my hair out and be less cautious about combing.


Hold hair while shampooing to prevent tangles. This is the most recent technique I've been doing, and it really helps. Pulling and holding a section of your hair with one hand while the other hand massages the shampoo into your scalp helps keep your hair strands from going this way and that way, cutting the amount of tangling that usually comes with shampooing.

Only thoroughly detangle new growth on wash day ( especially when it isn't flat ironed ). I usually detangle twice on wash days: before washing and thoroughly after washing when it's almost dry. Yes, when it's almost dry. Combing natural kinky hair is usually easiest in the shower, but that does not mix well with relaxed hair. At least not with my hair. The line of demarcation is already weak, and then hair is weakest when it's wet. The farthest I may go is finger detangle under the shower. Combing when my new growth is almost dry works better for me because I stretch the curl and detangle my relaxed hair first.

Coco caramel treatments. This is just my combination of the coconut cream and caramel treatments, aka natural relaxers. Calling them relaxers is an exaggeration, but they do help many girls loosen and really condition their natural hair. They are also often used for better flat ironing. When I start getting deep in my stretch I use them as my deep conditioners, some wash days I only use them on my new growth.

MY RECIPE:
1/2 CUP coconut milk
1 JAR banana food
1 TBSP molasses
3 TBSP honey
2 TBSP coconut oil and grape seed oil
1 TBSP apple cider vinegar
1 TBSP rose petal powder


Don't let new growth curl up when drying, band new growth right after towel drying. When my new growth really starts accumulating I stretch my curl by doing the band method solely on my new growth. I do this with small hair ties and wrap lotion, just because it was something I had on hand and it's easy to distribute. It's important to start on wet hair or it won't take at well. Doing this also aids detangling. I comb out my relaxed length while the bands are still in, resulting in no breakage. Then I take out the hair bands and comb out my stretched out new growth, which is easier because there's less curl and the bottom portion of my hair is tangle free.

Friday, August 23, 2013

scarf braid tutorial ( for protective styling )

Posted by Yahya at 8:49 PM 0 comments
 SCARF BRAID


MY MOTIATION?
Pocahontas braids have always been my second go to style. I consider it more of a low manipulation style rather than a protective because the ends are not tucked away. For those of you that don't know, a low manipulation style is one where your hair requires little handing and keeps the hair from tangling, like braids, where as a protective style is one where your ends are tucked away. I really like braids as a low manipulation style, my only problem is that, especially when my ends aren't thick, seeing my ends loose always bothers me for some reason. Sometimes I braid down my ends and loop them before using a hair tie. Would this be considered more of a protective style? Maybe, kinda. But than I worry that the tension and friction from the hair tie directly on my ends isn't good. Am I worrying too much? Maybe, probably.

So this is how I came up with this idea of using a silk scarf so I could tuck away my ends. This, I would definitely consider a protective style. I've been using this as a protective style very often this month. Usually I have to redo it in the morning or every other day, but because it's also a low manipulation style I don't have to comb. I also sometimes do my hair in a single side braid using a scarf, but here is how I do pigtails.

TUTORIAL

  • step 1- make sure you have a good sized scarf, the scarf I use is 60 inches long and 12 feet wide.
  • step 2 - I fold the width of the scarf once or twice and place it on my head. I make sure the ends of the scarf are even and clip one side so the scarf stays put while I braid the other side. the clip in this picture is a little hard to see, it's pink.
  • step 3 - I take three strands of hair, one of the sections will be braided with the scarf. I've tried only using two strands of hair and the scarf to braid, but didn't like the outcome. the result was too much scarf and not enough hair showing.
  • step 4 - I braid my hair like normal. when reaching the part where I would normally end the braid with a hair tie I stop and envelop my ends with the scarf.
  • step 5 - I twist half of the leftover scarf like shown so it's easier to ties into a knot.
  • step 6 - I tie it off with a knot. you can also envelop your ends and use a hair tie, but I like the look of the knot better.
  • step 7 - now you just un-clip the other side and redo the process... and you're done! 


Friday, July 19, 2013

pre-pool (how to prep hair before swimming)

Posted by Yahya at 11:15 AM 1 comments

PROTECTING YOUR HAIR
chlorine and salt water can be very damaging to the hair, they cause dryness and increase porosity. but this doesn't mean you have to skip out of the fun of water during the summer! there's a proper way to prep your hair to help shield it and minimize the damaging effects of chlorine and salt water.


this is just like a pre-poo treatment, except you saturate your hair in fresh water before you apply your oil or conditioner. simple, right? think of the hair cuticle like a cup with a sponge in it. if you go straight into chlorine or salt water the sponge will absorb that damaging water, but if you pour fresh water first the sponge will absorb that and there'll be no room for the damaging water. putting a layer of oil over the sponge will make it even harder for salt/chlorine water to penetrate. that's why I prefer to use oil, rather than conditioner, to prep. it also helps to make sure your hair's porosity is low as it'll make it harder for water to penetrate your strands. remember,

WHAT DO I USE?
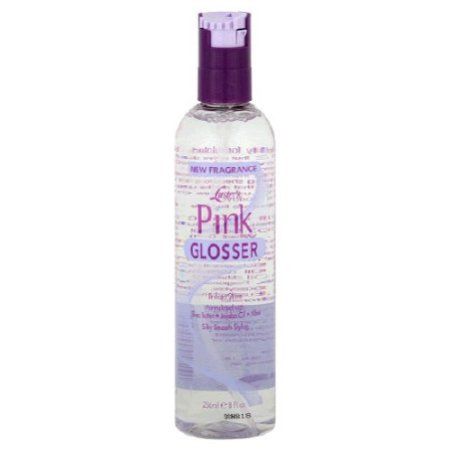
I was on vacation to Cayman Island a few weeks ago. I decided to use my miniature luster's pink glosser spray as my pre-pool oil. and I rather liked it, it seemed to get the job done. in the future, when this runs out, I'm going to try to use shea butter oil or other products with shea butter. I choose luster's pink glosser because...
  1. I had it left over from when I first started my hair care journey and wanted to get rid of it 
  2. it was small and convenient sized
  3. though it says it's non greasy, but from my memory it was greasy but light
  4. it had shea butter in it. in my past experience, using shea butter in a deep conditioner left a very heavy barrier on my hair, like 5 times the power of a sealing oil. it was so bad that it felt like the shea butter prevented moisture from entering my hair, and I hadn't even used much of it in the deep conditioner!
  5. the ingredients look pretty good: C9-11 Isoparaffin, C14-16 Normal Paraffin, Isoeicosane, PPG-14 Butyl Ether, PPG-40 Butyl Ether, Shea Butter Extract, Vitamin E, Jojoba Oil, Wheat Germ Oil, Kola Nut Extract, Eucalyptus Extract, Aloe Extract, Papaya Extract, Chamomile, Henna Extract, Lemongrass Extract, Hydrocotyl Extract, Safflower Oil, Castor Oil, Mink Oil, PPG-3 Benzyl Ether Myristate, Ethylhexyl Dimethyl PABA, Fragrance, Benzyl Benzoate, Hexyl Cinnamal, Benzyl Salicylate, Citronellol, Amyl Cinnamal, Butylphenyl Methylpropional, Eugenol, Hydroxyisohexyl 3-Cyclohexene Carboxaldehyde, Hydroxycitronellal.
so after applying my pre-pool products, I usually tie my hair in a single indian braid or a high bun, it depends on how active I'm going to be in the water. here is a picture of me in Cayman Island, before  heading to the jacuzzi.


Related Posts Plugin for WordPress, Blogger...
 

pocahontas' hair secrets Copyright © 2010 Designed by Ipietoon Blogger Template Sponsored by Online Shop Vector by Artshare